The CommCare Form Builder is a no-code tool that allows anyone to build their own forms in CommCare, which can then be launched into CommCare applications. This section provides a high-level overview of how to use the CommCare form builder.
Take advantage of calculations in forms to minimize errors. For example, if you are asking for a birth date, add a label afterwards that shows the calculated age. This may highlight an error in date entry if the age appears different than what the user expected.
Use labels to force the user to stop and verify their information. You can add a label that shows the user data they entered and encourages them to verify if it is correct. See Common Logic and Calculations.
Use groups to prevent writing the same display logic (and having to update it) for related questions. Groups also make it easier to manage large forms in the designer
Don't try to do too much in one form. If you make a simple form that is easy to use it has a higher probabilty of success than a complex one that tries to tackle too much.
1. Login to CommCare.
2. Navigate to the Dashboard.
3. From the Applications section, click an application name or click new application.

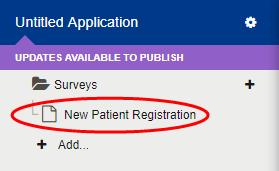
4. From the left navigation panel, click a form name.

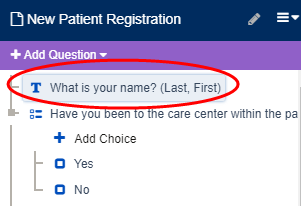
The question tree for the form is displayed.
The question tree displays all contents of a form and allows for editing and adding questions. It is structured in a branched view for ease of navigation.

1. Navigate to an application of interest.
2. Open the Form Builder.
3. From the question tree, click the Add Question drop-down.
4. Select the question type of interest.
Note: The drag-and-drop method can be used to organize questions in the question tree after they are created. The question tree can be displayed by question ID rather than language by changing the Display setting in the Form Tools menu.
There are several question types available for use in forms that capture data in multiple ways. Some require advanced formatting skills.
Please see for a full list of information: List of Question Types in CommCare.
After adding questions, the content, structure, and function of the questions are controlled with properties.
To access question properties
1. Navigate to an application of interest
2. Open the Form Builder
3. From the question tree, click a question of interest

The question properties window is displayed.

Note: More than one user can make changes to a form simultaneously. CommCare will prompt users to overwrite current changes or revert to the last saved version of the form if this occurs. When managing form properties, it is recommended that changes are saved often. CommCare will prompt mobile users to save changes prior to exiting a form in an application.
Display Text: text displayed to mobile users
Note: If the form will be deployed in more than one language, a field is displayed for each language.
Question ID: unique ID for questions displayed in reporting features but not visible to mobile users
Note: Responses to form questions are reported in relation to question IDs.

Requirement: marks questions mandatory so they cannot be unanswered
Note: Users receive an error message if a required question is skipped.
Once questions are added to a form and properties are set, form tools can be used to manage views, export data, edit source code, etc. Some functions in this menu are appropriate for use by advanced users only.
To access form tools
1. Navigate to an application of interest
2. Open the Form Builder
3. Click the menu icon next to the form name

The form tools menu will be displayed.

Copy: Copies a question or group of questions.
This tool can be used to move single or multiple (CTRL +SHIFT) questions to a different portion of a form or into a separate form. If a question is copied into a group where a question ID is already in use, "copy-1-of-" will be prefixed to the Question ID, while the Labels and Choice Values/Labels will remain the same.
Display: changes the question tree to display by question id rather than language (default)
Expand All: opens all groups and choices for multiple choice and checkbox questions
Collapse All: hides all groups and choices for multiple choice and checkbox questions
Display: language of the Question Tree
Expand Editor: opens the editor in full screen mode
Export Form Contents: exports questions and properties to Microsoft Excel. Learn more at https://dimagi.atlassian.net/wiki/x/uCXKfw.
Edit Source XML: opens form XML code for editing. This is feature is recommended for advanced users only.
Form Properties: displays properties of forms such as Form ID
Find usages: searches question or case property references within a form by question ID
Edit Bulk Translations: opens form translations in a new window that can be copied and edited in Microsoft Excel. Learn more at https://dimagi.atlassian.net/wiki/spaces/commcarepublic/pages/2143954382/Bulk+Application+Translations#Edit-Bulk-Translations-for-Forms.


• Question Type menu: changes a question type
Note: All choices in a multiple-choice question should be removed prior to changing a question type.
• Delete: deletes a question or group of questions
Note: This change cannot be undone.
• Show menu: displays options for sections of form properties to be displayed or hidden
📖 Learn more at https://dimagi.atlassian.net/wiki/x/WCvKfw.
📖 Learn more at https://dimagi.atlassian.net/wiki/x/GyjKfw.
Note: The expression editor can be used to aide in adding conditions.
📖 Learn more in the https://dimagi.atlassian.net/wiki/x/MhHKfw.
Note: Does not apply to all question types.
📖Learn more at https://dimagi.atlassian.net/wiki/spaces/commcarepublic/pages/2285240323/Validation+Conditions#Basic-Validation-Conditions.
📖Learn more at Multimedia in CommCare.
Advanced: used for formatting applications using advanced features such as writing XML code for logic
Validation Error Message: displays a message when a user response does not meet specified constraints
Note: Messages are specific to the deployed language of the form.
Data parent: links a form question as a child of another question
Appearance Attribute: defines an appearance for questions
Note: This is especially helpful for advanced formatting.
📖Learn more at https://dimagi.atlassian.net/wiki/x/NzXKfw.
Comment: a field to add notes about application design choices (Example: question purpose, hidden value explanation)
Note: Comments are only visible as a bubble above Question Properties in the Form Builder.
Hint Message: displays a message below label text to provide clarification to a question
Note: Messages over two lines of text are cut off after the character display limit is reached. Users can click a message to see full text.


▫ Short: abbreviated version of display text
Note: This is especially useful for us on devices that Java chat applications.
▫ Long: long version of display text
All forms also have behind the scenes Form Settings. Learn more at Form Settings
To edit source XML
Navigate to the Form Builder.
Click the Form Tools menu dropdown.
Select Edit Source XML.
Click Update Source when finished.


Yes. Go to Form Settings , and select “Copy Form”
Yes. Download the form locally from its original location and upload it to the new location.
To copy a form to a different application
Login to CommCare
Navigate to the Dashboard
From the Applications section, click an application name
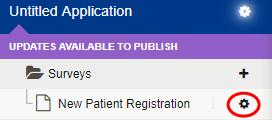
From the left navigation panel, click the gear icon next to title of the form of interest
Click the Actions tab.

In the XForm section, click Download.
Open the destination application.
Add a new form.
Repeat steps 4-5.
In the XForm section, click Upload.
1Choose the form that was downloaded from the source application.

Note: Case save and load properties are preserved with this method. If only certain questions are needed from a particular form, the copy and paste method should be used to paste them into the new form.
To assist with application building efficiency, we created a feature for use in formbuilder that allows you to add questions via a command bar interface. You can now quickly add questions to your form without having to use your mouse!
Click to expand.
To open the command bar when in form builder, you can use the following shortcuts:
For Mac: ⌘ + ;
For Windows: Control + ;
Once the command bar is open, you can enter a command and press <Enter> to execute it. Currently there are two command types: Add a New Question and Jump to Question.
To Add a New Question, there are three parts to the input:
Question Type
This refers to the various question types used in CommCare (i.e. Text, Integer, Date, etc.).
Position (optional)
This command will allow you to dictate where the question is placed in the form. There are currently 4 commands:
Before: Used to put a question before another one
After: Used to put a question after another one
In: Used to place a choice in a Multiple Choice or Checkbox question or inside a Group based question (Groups, Repeats or Question list)
First In: Used to place a choice in a Multiple Choice or Checkbox question or inside a Group based question (Groups, Repeats or Question list)
If you do not specify a position the new question will be added after the currently selected question
Question ID (optional)
This is the question you would like to place the question type near, relevant to the position you input in the second step.
The currently selected question will be used if you do not specify a Question ID.
This section will always start with #.
When entered in the command bar, the format will look like:
<Question Type> <position> #form/<question_id>
For the Jump to Question command, there is one part to the input: the question path. When entered in the command bar, the format will look like:
#form/<question_id>
We have a registration form in an application tracking the outcome of a woman’s pregnancy. We want to get information regarding the mother’s age, but forgot to add a question asking it. Let’s do that now.
Using the shortcut (Control + ; for Windows or ⌘ + ; for Mac) will open a command bar at the top of the question tree:

Selecting the bar that states “Enter Command” will open a drop-down window with the various question types you can add to a form:
(Note: This field should be auto-selected after using the shortcut)

Since we want to ask about the mother’s age, we will want to add an integer question. We’ll also want to place the question after the ‘Village Name’ question (question_id = village_name). So, we’ll want to enter the following into the command bar:
Once we input this text and hit enter, an Integer based question will be added to formbuilder. Since we used the after position, it will appear after the question, “Village Name”


After adding the question, you should automatically have the new question selected so that you can continue using your keyboard to fill out the Display Text.

Each command will auto-fill so you can use your arrow keys to move up and down the list to select the appropriate question type, position or #form/<question> that you want to select.
Hitting <Tab> will auto-complete the current argument and move the cursor so you can start typing the next argument.
When entering a command, it is not necessary to type out each argument entirely. For example, to add a new label after the current question one can simply type Ctrl+; to open the command bar, then L so Label is the top/selected option in the auto-complete list, then <Enter> to execute the command.
In and First In are used for multiple choice, checkbox or group based questions.
When using Jump to Question it is not necessary to type the exact question path. Instead you can type # followed by part of the question ID or path. For example:
Ctrl+; #age <Enter>
Have a very long survey that you’d rather put into an Excel file before uploading in the form designer? You can use XLSForm, a free, online form-building tools that allow you to design your form in an Excel file, and then copy the created XML code into the CommCareHQ form designer. You can work on the Excel file offline and then upload it later.
You can see detailed instructions on how to set up the Excel file at https://docs.getodk.org/form-design-intro/.
Click to expand.
There are many XLSForm advanced formatting options that will not work with CommCare. Please review the Known Limitations section below carefully before building forms using XLSForms!
This tool (XLSForm) is provided by a third party, and it is not within the responsibility of the Dimagi/CommCare support team to maintain or support.
Build your form in Excel (following the instructions on http://opendatakit.org/use/xlsform/ ) and then upload it to XLSForm (http://opendatakit.org/xiframe/ ). You can then download the XForm and upload it into our form builder on HQ.
As you build your form you can test it online using the validation tool: https://opendatakit.org/use/validate/
To load into CommCare, download the xform, a file that will end in .xml
Once in the app builder on CommCareHQ, create a new blank form. You can then upload the xform directly on the form settings page by clicking on the gear icon for the respective form, then selecting the "Actions" tab and "Upload".

We strongly recommend that you test this with a short form before building a huge form so that you are comfortable with the process.
If you are familiar with XML, you may notice some differences in syntax between the XML generated and CommCare’s language – Don’t worry! Noticeable differences are validation writing and writing for display conditions (what XLSForm calls “relevancy”). As all of these tools are based on the same standard, CommCare HQ will automatically fix the minor differences from FormHub syntax to meet our syntax requirements.
Example: In CommCare's Form Builder, a display condition might look like: /data/pizza_fan = 'no' while in Formhub it would look like: ${pizza_fan} = 'no' - these will be updated when the xml file is generated
To avoid issues with itext and how CommCare deals with languages make sure to specify the language in the header. For example, if your app is only in English then make sure to put "label::en" instead of just "label" - if you do CommCare will add two languages (default and English).
To keep using "data" as the ID of each form (the CommCare standard), please be sure to name your excel file "data". CommCare may not recognize the "settings" tab of the Excel file described XLSForm.
Labels (called "notes" in the other tools) are often treated as text questions when the form is uploaded to CommCare. There are 2 easy ways to address this issue. #1 You can change the question type from Text to Label in the CommCare form builder. This is a known issue and will eventually be fixed. #2 If you use the question type "acknowledge" then CommCare will interpret that as a label with the checkbox confirmation turned on.
You can test your forms online using https://opendatakit.org/use/validate/
If you choose to use XLSform's ability to handle multiple languages, by reading the XLSforms documentation and adding additional columns to contain the additional language content, please note the following:
The XLSform documentation tells you to create additional columns and give those new columns headers like label::English. However, if your purpose is to eventually paste that XML into CommCare, then you need to be careful about what the title of the language you use in those column headers. For commcare use, you should not use the full language name like "English," but instead must use the "short language codes," such as en and tha, that are shown in the little "Languages" pull-down menu in CommCare's left nav bar. Therefore your additional column headers will look like label::en or required_message::tha.
If your additional language content uses alphabets other than the latin character set, you will have to be careful about the way that you handle the process of copying your finally converted XML file into CommCare. Normally, many users would simply double-click the XML file that they had downloaded from the converter, select-all and copy, and then paste that XML into the CommCare forms editor. However, on Windows, it is likely that the default application that loads when you double-click the XML document will not display the non-latin character set correctly, and will therefore paste as gibberish into your CommCare form. If this happens, then, when you download the XML document from the converter, open it in a text-editing application that is more able to handle non-latin alphabets (one example is the Notepad++ app for Windows.) This app will correctly handle the non-latin characters in the XML, and then you can successfully cut-and-paste from that app into the CommCare form editor.
There are some things that don't work well when uploading a Formhub form to CommCare; these are active efforts to make these more compatible
You may get an error message when uploading your form that CommCare xmlns will be added. You can ignore this message. If, once inside the Form Builder, you see a persistent error message about the Form Name make any minor change in the form, save, and refresh the page.
When first opening your form to edit you may see a message that says "id is not defined." Just click "ok" and then make any minor change in the form, save, and refresh the page.
If you have multiple languages in your Excel form but not in your CommCare app, any additional languages that are not already in your app will be deleted. Before uploading anything go to the application -> languages and make sure all languages are added. On the languages page you will see that each language has a 2 or 3 letter code (English = en; Hindi = hin). In your Excel file you must use those codes in the headers. So for English you would use "label::en" as the header for the label column on both tabs of the Excel file. These are case sensitive. Alternatively you can upload the xform with one language, add the additional language, and then use Bulk Translation to add additional languages.
Both tools described here uses the name of you Excel file as the root of all of the xpaths in your form. So if you call your file "survey" then your data will look like /survey/question4 instead of /data/question4. You cannot change this after uploading into CommCare. We recommend that you name your excel file "data" if you want to be consistent.
The "add other option" for multiple choice questions will generate the "other" question with the correct question ID but will not generate the correct skip logic.
You may also notice some extra "hidden values" at the bottom of your form after using the Excel tools. You should delete these. These hidden values are formhub, uuid, meta and instanceID.
Advanced features link hint text, multimedia, read-only, and complex logic may not be well supported.
Shortcut for creating the XLSForm format from CommCare's Export Form Contents
You may end up with an Excel form that is formatted like https://dimagi.atlassian.net/wiki/x/uCXKfw as generated in CommCare, where all of the choices and questions are on one page. Below is a process to simplify breaking it into two pages.
The two parts of the process are:
Split the choices from the questions (e.g. if the question is "What block do you live in" then the choices would be "Manjhanpur", "Mooratganj", "Kaneli", etc); and
Format the sheets to match what XLSForm wants.
Here are the steps
Create a new column in excel that is the name of the question for the choices. To do this, you can use an if statement. If you have the question names in column C and the type of question in column H, then it would bethe following: =if(H3="Select Item",C3,C2) . This way, if you have a question, it will copy the question name, and if you have a choice, it will copy the value above it, which will be the question name from its question.
Create a new column in excel that equals 1 if the row is a choice and 0 if the row is a question.
Copy the two new columns that you created and paste special values them on top of themselves.
Sort the newly created column of 0's and 1's for question to split the questions and choices. Then copy the choices to their own sheet.
On the new choices sheet, get rid of the columns that you don't need anymore. Then change the column headings to match the format required.
Go back to the sheet with the list of questions. Use find and replace to change the names we have used for question type with what xforms uses (e.g. select_one rather than single select, text rather than text question. So find and replace all "single select" with "select_one").
Create a new column in excel. In this column, if the type of question is select_one or select_multiple, then the value should be "type nameofquestion". If it is any other type, then it should just be the type of question.
For example, if the type of question is select_one and the name of question is consent, then the value in this column should be "select_one consent". If it is a text question, then this value should be text. To do this, if the question name is in column B and the type of question is in column C, starting from the 3rd row, you can use =if(OR(C3="select_one",C3="select_multiple"), C3&" "&B3, B3).
Change the names of the columns to match the format for xforms and delete any that you don't want. You will need to delete the validations if you have not edited them for xforms format.
Upload the form following the instructions above.
The below is a primer on how to reference form questions and case properties using the hashtag shortcut.
When in doubt, you can always drag and drop questions or case properties from the windows on the left of the form builder. But if you want to go for speed, here's how the hashtags work
Click to expand.
You don't have to know the exact format of the hashtag reference in order to use hashtags. Just enter # and start typing to narrow down results. An autocomplete dropdown will appear that displays the best matches to what you've typed.
Autocomplete finds matches by case property name, question ID, and question text.
References to form questions always start with #form. They follow the format:
Let's say I want to reference the question with the id "favorite_color". The reference would be:
References to case properties always start with #case. They follow the format:
Let's say I want to reference the case property "case_name". The reference would be:
NOTE: If your app has multiple case types, this reference can only access case properties in the case type defined in your form's module.
If your current module's case type is a child case, you can also reference case properties of the parent case. References to the parent case follow the format:
#case/parent/case_property_name
Let's say I want to reference the case property "case_name" of my parent case. The reference would be:
It is also possible to reference your parent's parent. For example, if you have three modules: household, family, baby, where "family" is a child case of "household", and "baby" is a child case of "family". In the baby module, you can reference the name of the household (my "grandparent" case) using the following format:
#case/grandparent/case_property_name
Let's say I'm in a form in the "baby" module, and I want to reference the name of the household. The reference would be:
#case/grandparent/case_name


